반응형


'npm'은(는) 내부 또는 외부 명령, 실행할 수 있는 프로그램, 또는 배치 파일이 아닙니다.

처음 이런 문구를 맞닥뜨리면 당황스러울 수 있는 표현인데
한번 처리를 하고나면 편-안 해지는 문장이다

대충 npm을 맞게 설치 했다면, npm이 설치된 폴더가 아닌 다른 위치에서도 사용할 수 있도록해주는 걸
환경 변수 설정이라고 하는데

이러한 환경변수 설정을 따로 해주어야
cmd에서 node나 npm 명령어를 아무데서나 호출하여 사용할 수 있다


환경변수 설정하는법은 아래 스샷 참고


window 키 누른 다음, 환경 변수 검색

시스템 환경 변수 편집 ㄱㄱ


고급 탭 아래의 환경 변수 클릭


아래쪽의 시스템 변수에서 변수명이 Path인 곳을 찾아 더블클릭 또는 편집 ㄱㄱ


우측 상단의 새로만들기 또는 빈칸을 더블클릭하여 아래의 폴더 위치를 복붙하자


윈도우 기준 노드 설치 위치

C:/Program%20Files/nodejs/


확인 - 확인을 눌러 세팅을 완료하면

node 설치 폴더가 아닌 다른 모든 위치에서 node 사용이 가능해진다


참고 : 

https://stackoverflow.com/questions/27864040/fixing-npm-path-in-windows-8-and-10


Fixing npm path in Windows 8 and 10

Have done a lot of googling, tried reinstalling node.js using the official installer, but my npm pathing still doesn't work. This doesn't work npm install foo I get an error message saying missing

stackoverflow.com


반응형
반응형

https://studyingpingu.tistory.com/77


[C#] 그리드 영역 나누는 RowDefinition과 GridSplitter 동적 생성하는 법

grid를 분할할수있는 RowDefinition과 분할 영역을 자유롭게 바꿀수있는 gridsplitter를 c# 코드적으로 생성하는 법을 기록해봄 이 방법을 응용하면 columndefinition에도 적용이 가능하다 gridsplitter란 진짜..

studyingpingu.tistory.com


저번글에 이어 조금더 완성도가 높아진 gridsplitter 글


그리드의 row, column의 영역을 마우스 드래그로 조절할수있는 gridsplitter 추가 예제


divideCnt만 정해주면 그만큼 gridsplitter 추가해주는 코드


public void divideRowAuto()
{	
	if (divideCnt == 0) return;

	double dividedHeight = mainGrid.Height / divideCnt;

	mainGrid.RowDefinitions.Clear();
	mainGrid.Children.Clear();

	//첫번째 로우
	RowDefinition row = new RowDefinition()
	{
		Height = new GridLength(dividedHeight, GridUnitType.Star),
		MinHeight = 30
	};
	mainGrid.RowDefinitions.Add(row);

	for (int i = 1; i <= (divideCnt - 1) * 2; i += 2)
	{
		RowDefinition row1 = new RowDefinition()
		{
			Height = new GridLength(15),
			MaxHeight = 15,
			MinHeight = 15
		};

		GridSplitter splitter1 = new GridSplitter()
		{
			VerticalAlignment = VerticalAlignment.Center,
			HorizontalAlignment = HorizontalAlignment.Stretch,
			ResizeBehavior = GridResizeBehavior.PreviousAndNext,
			Background = new SolidColorBrush(Colors.Red),
			Height = 2
		};
		mainGrid.RowDefinitions.Add(row1);
		mainGrid.Children.Add(splitter1);
		
		Grid.SetRow(splitter1, i);
		Grid.SetColumn(splitter1, 0);

		RowDefinition row2 = new RowDefinition()
		{
			Height = new GridLength(dividedHeight, GridUnitType.Star),
			MinHeight = 30,
		};

		mainGrid.RowDefinitions.Add(row2);
	}
}


코드 요약

gridsplitter는 독립된 row에 하나씩 배치된다

rowdefinition은 추가하면 이거 자체가 row다 보니 순서대로 추가가 되지만

gridsplitter를 생성한 다음 그리드에 추가하고 row를 세팅해줘야 분할하고자 하는 위치에 정확하게 추가된다


gridsplitter 1개가 생기면 row는 총 3개가 된다


6분할 예시 (divideCnt가 6인 경우 gridsplitter는 5개가 생성됨)


반응형
반응형


grid를 분할할수있는 RowDefinition과 분할 영역을 자유롭게 바꿀수있는

gridsplitter를 c# 코드적으로 생성하는 법을 기록해봄


이 방법을 응용하면 columndefinition에도 적용이 가능하다


gridsplitter란

진짜 말그대로 grid 영역 늘였다 줄였다 가능한 선


예시 grid

대충 사용하려는 grid는 위와같다


코드 영역을 주석으로 대강 설명해둔 코드들

mainGrid.RowDefinitions.Add(new RowDefinition
{
    //auto, star pixel로 Row의 height 지정 가능 
    Height = GridLength.Auto,
    
    //Height = new GridLength(1, GridUnitType.Star), 
    //1* 또는*과 같은듯 2*을 하고 싶다면 아래와 같이 적으면 됨
    //Height = new GridLength(2, GridUnitType.Star), 
    
    MinHeight = 15
    // 생성된 Row가 갖는 최소한의 높이 영역 값이 커질수록
    //각 Row가 갖는 영역의 height가 높아진다/넓어진다
});

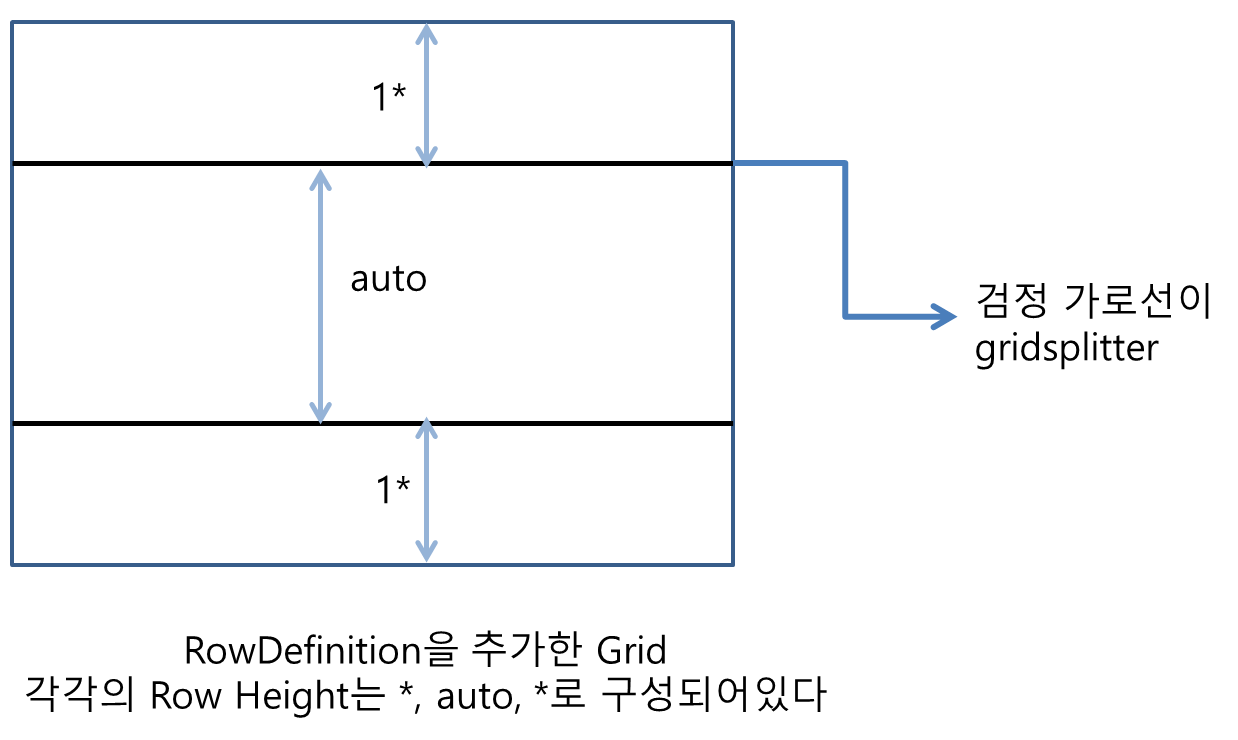
height를 auto로 잡지 않으면 gridsplitter로 영역을 재분배해도 보이지않는 한계가 생긴다

만약 row가 3개이고 height 값들이 다 1*인 경우,

1을 3으로 나눈 영역까지만 이동되는 그런거


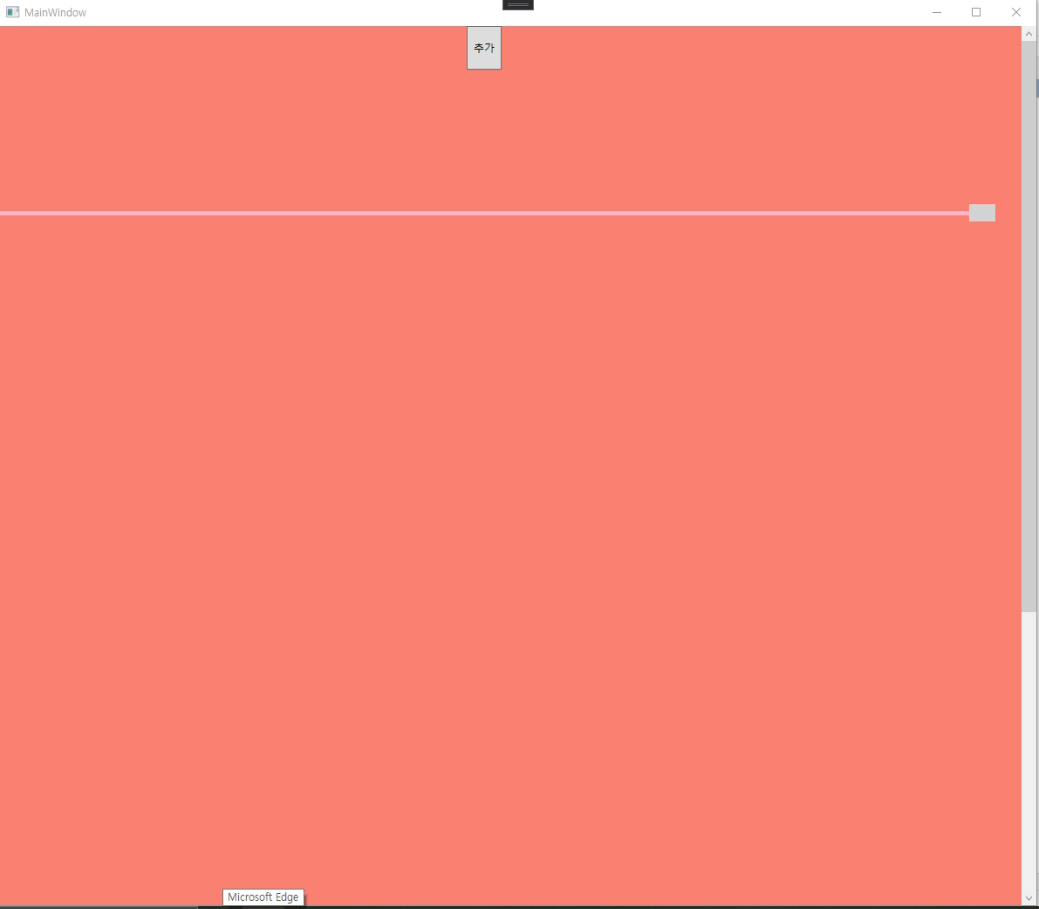
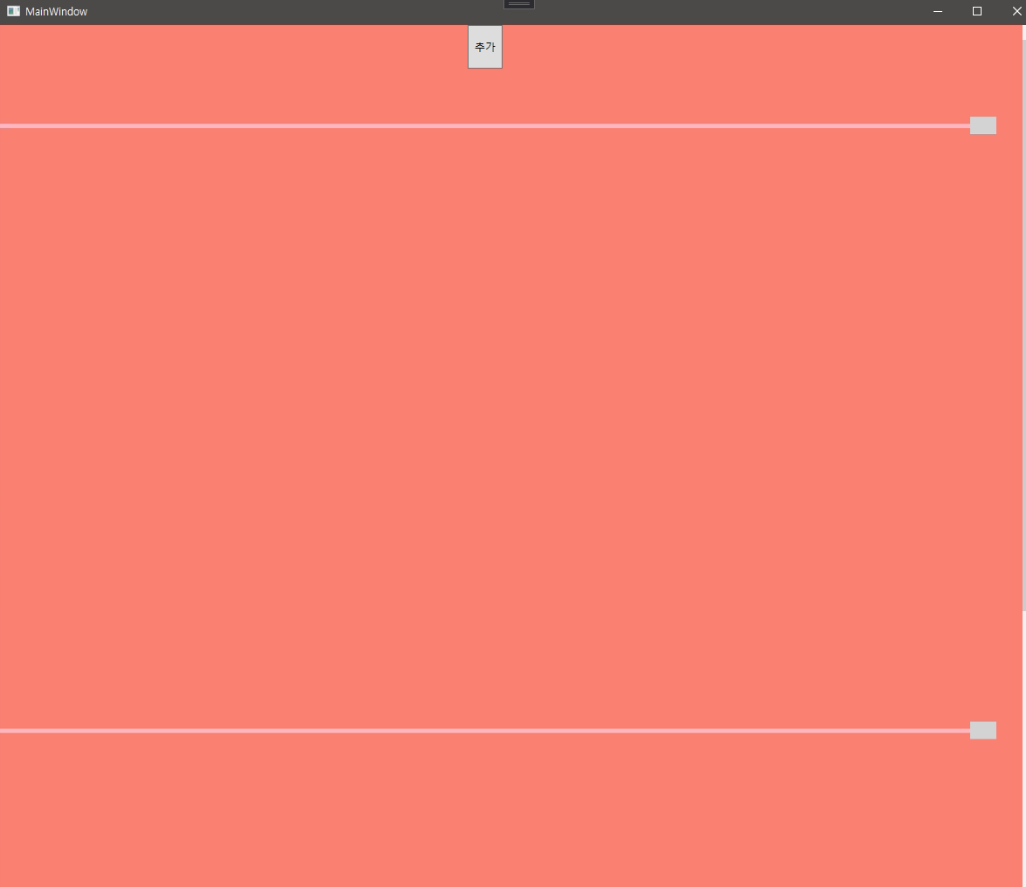
얇은 선으로 생겨서 마우스로 드래그하여grid 영역 조절이 가능한 gridsplitter

GridSplitter splitter = new GridSplitter()
{	
    //gridsplitter 선을 그리드 row 영역의 맨 위에 오게 함
    VerticalAlignment = VerticalAlignment.Top,
    
    //Row 영역에 gridsplitter를 생성하는 경우 stretch 속성을 사용하여
    //가로를 꽉차게 해주는 듯하다    
    HorizontalAlignment = HorizontalAlignment.Stretch,
    
    //ResizeBehavior 이건 조금 헷갈리는데 위아래로 그리드 영역을 넓히고 줄이고 싶으면
    //PreviousAndNext 이 값을 사용하면 되는듯 몇개의 값들이 더 있긴 한데
    //그건 본인 상황에 따라 다르게 쓰면 되겠다
    ResizeBehavior = GridResizeBehavior.PreviousAndNext,
    
    //gridsplitter 선 색
    Background = new SolidColorBrush(Colors.LightPink),
    
    //gridsplitter 두께
    Height = 5
};


    //메인 그리드에 생성한 splitter들을 추가해준다
    mainGrid.Children.Add(splitter);
    mainGrid.Children.Add(splitter2);
	
    //나는 각 컬럼 별 생성한 gridsplitter를 다르게 사용할 것이므로 다음과 같이
    //그리드의 Row 영역에 덧붙여 줬다
    Grid.SetRow(splitter, mainGrid.RowDefinitions.Count - 1);
    Grid.SetColumn(splitter, 0);

    Grid.SetRow(splitter2, mainGrid.RowDefinitions.Count - 1);
    Grid.SetColumn(splitter2, 1);

동적으로 생성한 gridsplitter를 메인으로 사용할 그리드에 추가하는 방법


아래는 최종 본 cs 코드

//추가한 gridsplitter 위아래로 자유롭게 이동됨, gridsplitter 잘 추가됨
private void addRow_Click(object sender, RoutedEventArgs e)
{
    mainGrid.RowDefinitions.Add(new RowDefinition
    {
        //auto, star pixel로 사이즈 지정 가능 
        Height = GridLength.Auto,
        //Height = new GridLength(1, GridUnitType.Star),
        MinHeight = 15
    });

    GridSplitter splitter = new GridSplitter()
    {
        VerticalAlignment = VerticalAlignment.Top,
        HorizontalAlignment = HorizontalAlignment.Stretch,
        ResizeBehavior = GridResizeBehavior.PreviousAndNext,
        Background = new SolidColorBrush(Colors.LightPink),
        Height = 5
    };

    GridSplitter splitter2 = new GridSplitter()
    {
        VerticalAlignment = VerticalAlignment.Top,
        HorizontalAlignment = HorizontalAlignment.Stretch,
        ResizeBehavior = GridResizeBehavior.PreviousAndNext,
        Background = new SolidColorBrush(Colors.LightGray),
        Margin = new Thickness(0, -8, 0, 0),
        Height = 20
    };

    mainGrid.Children.Add(splitter);
    mainGrid.Children.Add(splitter2);

    Grid.SetRow(splitter, mainGrid.RowDefinitions.Count - 1);
    Grid.SetColumn(splitter, 0);

    Grid.SetRow(splitter2, mainGrid.RowDefinitions.Count - 1);
    Grid.SetColumn(splitter2, 1);


    mainGrid.RowDefinitions.Add(new RowDefinition
    {
        Height = new GridLength(1, GridUnitType.Star)
    });
}


사용한 xaml 코드

<ScrollViewer>
    <Grid x:Name="mainGrid" Background="Salmon" Height="1500">
        <Grid.RowDefinitions>
            <RowDefinition Height="*" MinHeight="25"/>                
        </Grid.RowDefinitions>
        <Grid.ColumnDefinitions>
            <ColumnDefinition Width="1*" />
            <ColumnDefinition Width="0*" MinWidth="30" />
            <ColumnDefinition Width="0*" MinWidth="30" />
        </Grid.ColumnDefinitions>
        <Button x:Name="addRow" Click="addRow_Click" Width="40" Panel.ZIndex="12" Height="50" VerticalAlignment="Top">추가</Button>        
    </Grid>
</ScrollViewer>

현재 grid의 height의 경우 고정된 값으로 주었기때문에 동적으로 재조절해서 사용하면 되겠다


실행 예시


msdn 참고


출처 : https://social.msdn.microsoft.com/Forums/vstudio/en-US/8f9ad61f-3af6-44ef-a1a7-e14c8c323852/how-to-programmatically-create-and-attach-a-gridsplitter-to-a-grid?forum=wpf 


how to programmatically create and attach a GridSplitter to a Grid?

thx for the tip, but I trying to use stuffs mean for the Grid, unless the custom-tool behave as like the vanilla GridSplitter within the Grid, its really not feasible for me to pick on another 3rd party tool for the project.

social.msdn.microsoft.com


반응형
반응형

html 페이지에서 메뉴를 선택하고 선택한 정보를 출력하고 싶어서 사용해본 셀렉트 태그

아래의 빈 공백은 텍스트입력하는 input 태그이므로 신경안써도됨


html

<select class="form-control" id="menu" name="menu" required>
    <option value="" disabled selected>메뉴</option>
    <option value="boong">붕어빵</option>
    <option value="tako">타코야키</option>
    <option value="ddang">땅콩과자</option>
    <option value="other">그 외 간식</option>
</select>


select 태그에 required 속성을 덧붙여주면 해당 셀렉트 태그의 선택이 필수 선택으로 지정된다


나중에 form 형식에 셀렉트 태그를 넣은 다음 서버로 정보를 전달할 때 쏠쏠함

회원가입 경우, *필수 입력 정보가 필요할 때 쓰면된다


위의 이미지를 바탕으로 기록해보면

메뉴에 대해서 반드시 옵션 값을 선택해야하며, 메뉴라고 적혀있는 옵션 값은 선택이 불가능하다

각각의 메뉴의 value 값은 자바스크립트에서 데이터를 얻어올 때 유용하게 쓰인다


사용자에게 보여질 텍스트는 옵션 태그 사이에 넣어주면 된다


javascript

async function register(){
	var menu = document.getElementById("menu").value;
	console.log("선택한 메뉴 : "+menu);
}

위의 코드처럼 작성해보면 선택한 메뉴를 출력해볼 수 있다

저장이 필요하다면 위의 방식처럼 옵션의 value에 접근하여 저장하거나 데이터를 가공하면 되겠다


좀더 고급지게 작성할 수 있는데 일단 제일 쉽고 간단한 방법을 사용했음

다양한 방법을 덧붙인 사용을 원하면 아래 mdn 참고하자


참고 : https://developer.mozilla.org/ko/docs/Web/HTML/Element/select#attr-disabled


<select> - HTML: Hypertext Markup Language | MDN

HTML <select> 요소는 옵션 메뉴를 제공하는 컨트롤을 나타냅니다.

developer.mozilla.org


반응형

+ Recent posts